Shop: Rifle Paper Co

So before we hit the beach, we made a quick pit stop in Winter Park to shop at Rifle Paper Co. We are pretty much obsessed with Anna Bond. I love absolutely everything she does, so I was pretty excited to see her shop.

I wish I could write like this on my chalkboard. It’s just awesome.

The shop was pretty small, but the girls in the back were busy filling order. Sorry we packed our wide angle lens away, so we couldn’t get an unobstructed view of the wall of cards. If you don’t have a set of RPC cards, go buy some now. They are beautiful and the best way to send someone a note.

I really wanted to take that fox home. I think Ramona did too. We didn’t get pictures of the prints which are awesome. (We own this one and this one which is on the gallery wall.) Our visit was cut a little short when Ramona yelled out, “Poo poo.” When a toddler tells you that, you just need to run to the nearest restroom and forget about whatever future blog post you wanted to write.

So here’s our take. A set of 2 notebooks that are very slim. They work great for to do lists or grocery lists because it’s easy to tote them around. A notepad since it looks a million times better than my current notepad from the desk of Amber Wills 1st Grade Teacher. 3 rolls of washi tape that might come in handy for a certain little girls 3rd birthday. An assorted floral set of cards since I am almost out of my other RPC set. I preferred assorted blank cards because I can use them for whatever I want.

Of course all of this will look good in my secretary once it gets moved in and prepped for use!

Tagged As ,

Terry Beach Cover Up a Year in the Making

So this is somewhat of a confession about how I am a lazy sewer and as Nick says, “quit sewing every time sew.” First, I will admit I hate to sew bias tape that is why I decided to make this cover up to you know hone those skills. I shouldn’t say I hate to sew it. I am just terrible at sewing it which is frustrating which is why I gave up on making this a year ago. Yes a year.

I had great ambitions of sewing Ramona a terry cover up via Prudent Baby. I picked up the project with all my pieces cut and the straps with bias sewn (poorly).

I found this advice. Clearly I approached the project the wrong way the first time around. Once the house was sparkling and I looked flawless, I began to attack the cover up again. Therefore I never began, that’s the end of this post. Ha! In reality I put on yoga pants and hunched over the machine.

I had to fold over the ends of the straps. My machine wasn’t too happy with me. I had to adjust the thread tension and trudge through. As you can see, it wasn’t exactly a pretty outcome. However the ends are hidden once you snap them to the cover up, so it wasn’t a big deal in the end. I didn’t sew the straps all that great as you can see.

I learned how to attach snaps too! Yea for learning. I used pliers similar to these. In case you want to know how to apply snaps using this tool (also for my reference later), you put the spiked end facing out.

The socket snap fits into the bottom with the raised side facing up towards the spikes. Push down on your fabric and done.

When you attach the ball snap, face the ball down into the pliers. Press down on your fabric, and you can officially snap stuff together. Once I figured out how to work the pilers, attaching the snaps wasn’t a big deal.

I sewed the terry to the fabric. Then attached the bias. It actually looked good. I was shocked (and relieved). I made sure to take my time and sew it correctly. If I’m honest with you, I knew how to sew it correctly before I sewed the straps. I chose to be lazy, and it shows. Lesson learned.

I was so nervous about sewing the terry strip to the top of my cover up since I knew the straps were difficult when I folded them over. I thought it would be too thick and give my machine nightmares, but it was no trouble at all. I wish I would have attached the snaps to the terry strip after I sewed it to the cover up though. The snaps were getting caught on my foot, so it would have been easier. Maybe next time.

Tada! Finished. It wasn’t that bad. I am just dramatic. (Don’t tell Nick I admitted to that.) I wish I would have redone the straps correctly before I finished the rest of the cover, but I honestly thought the whole thing was going to be a bust. I’m lame sometimes.

Surprise we are on vacation. Ramona is modeling her cover up at the beach. It hangs a little low on her, but it stays up fine. I think if it was higher (which I could easily do by adding snaps higher on the straps) it would bother her.

Tagged As , ,

July Goal Check

1. Complete at least 1 crafty project per month.

I am adding Nick’s art mod to my list of crafts in July. (Technically I spray painted the frame.) I guess putting the gallery wall up was also sort of crafty-ish. However you look at it, I am insanely in love with the art and the wall.

Another art like installation was our gigantic LOVE sign on the mantel. I just spray painted them a pop blue. Geez looks like I need to craft without spray paint sometime. Although if spray paint is what’s making our formal living room corner look awesome, then everyone should invest in Rust-oleum stat.

2. Read at least 1 book per month.

I didn’t read as many books this month as I have been because I got stuck on The Devil in Pew Number Seven. It’s a true story about a pastor and his family that are harassed by a man in their small town. I don’t want to spoil it, but I will say 1) it is very emotional and 2) it walks the line between autobiography and devotional.

If I am completely honest, it gave me nightmares too. As a parent I cannot imagine anything keeping me in a situation that is dangerous to my child, so I was frustrated that the parents chose to stay after continued attacks and close calls. I struggled through most of the story because of that. With all that being said, I would recommended it. The author is an amazing person. She chose to relive the most terrifying time in her life to share her story. It will shake, move, and change you.

3. Do more fun things with Ramona.

Ramona and I went to Fort Worth Fire Station #2 with a mom’s group in our area. The station is near downtown Fort Worth and has to be the coolest station possibly ever. It’s 2 stories and is the only station in Fort Worth with fireman’s poles. They have a full basketball court.

Afterward we went to the Fort Worth Children’s Museum for lunch and a little bit of play time with friends. Ramona loved it. I really need to get a membership there. We didn’t stay long because I believe that skipping your nap is one of the deadly sins. However she did shop for plenty of grocery and take care of a few babies.

4. Journal every day.

I actually blogged on the life side of things here, so you can read one of my funny journal entries about Ramona and her birthday party obsession.

Last month I did say I was going to diet starting in July because we’ve been having some sort of food revolution here at la casa. I have been low carbing it since July 5th. In case you are wondering what Nick and I are doing. (He’s been at it for much longer than I have.)  We eat less than 30 carbs per day (read: lots of protein and veggies). We drink only coffee for breakfast and give ourselves a cheat meal every 10th day. You can read more about it here. It is probably the easiest diet I’ve ever been on. Not that I don’t want a cupcake or a baguette every now and again, but I am not hungry which is always the worst part of a diet. Plus I can go out to eat because you can always find low carb options at almost any restaurant.

Tagged As ,

Craigslist Weekend

Despite what you might think, I don’t stalk craigslist all the time. However I was overly active on CL this weekend, and it seriously paid off.

I found this secretary in Arlington for $40. It was about 5 minutes from our house, so we rolled out of bed Saturday morning and headed to pick it up. (Ramona was at my parents’ house, so we could have a hot date Friday. It was an extra win that we didn’t have to pick this up with a little one.)

We got to the apartment and found out it was on the 3rd floor. Before we freaked out too much, the lady told us there was an elevator. Little did we know it was an active adult complex. Yet another win for us! Originally, I thought I would paint it. Once I saw it I really liked the tone of the wood, so I might just leave it alone for now. I have no idea where it should go, but there is more than 1 possibility. Plus I’ve been wanting a secretary for a while. The price was right. The drive was nothing. I will just think about purpose and etc later.

There is one drawer that is damaged, but I am going with the argument that it adds character to the piece. The drawers and hutch at the top aren’t the easiest to open, but with a toddler that is probably a good thing.

Later Saturday night I was Craigslist creeping again. I found this ad a mere 20 minutes after it was posted. I emailed immediately to see when I could come pick it up. Someone had already emailed, but I responded quicker and offered to pick it up the next morning.

The seller texted me in the morning with the go ahead, and I sent Nick out to pick up the settee. (You already knew that if you liked us on facebook.) I admit it is in rough shape. It is broken at the top, but for $20 I can fix and reupholster it. Normally I wouldn’t reupholster myself, but I am going to try it since the piece was so cheap. I have more of a budget to work with in case I botch the reupholstery.

It says Made in Belgium on the bottom, so that’s cool. This settee is going to be gorgeous. It is going in our entry that is currently housing extra bentwoods and an Eames chair (because that’s how flush with chairs we are). We are thinking paint it black and reupholster in burlap. It’s okay if it’s itchy since it’s going to be in the entry and won’t be used for sitting often. The burlap will warm the space and provide a nice texture.

Tagged As , ,

Love Sign Complete

Remember our huge letters from the Nashville flea? I think we broke a record with a mere month turn around on this project. Typically we sit on our purchases for months nay years before working on them. I blame the size of the letters for my swift action. I can’t procrastinate when they take up so much space.

The plan was to spray paint them a pop color for the mantel since our mantel is huge and styling it is frustrating an undertaking.

I began by cleaning them up with windex and a cloth. The rust didn’t completely wipe off, but the goal was just to clean them up to prime. I didn’t need to get the rust off entirely.

I primed and painted the letters with Rust-oleum Stops Rust label…it’s supposed to stop rust. The label said it works for metals that are lightly rusted which I felt was more accurate than the heavily rusted option.

After they were cleaned, I primed the grass letters. It took about 6 cans to prime all the letters. I sprayed the front and the back even though the back wouldn’t be seen I didn’t want rusty metal up against my pretty greige walls.

I considered painting the O an off white. Once I saw it up in the room, I nixed it. It took about 5 cans of blue to cover all 4 letters.

Now the task of putting up the letter on the mantel so they won’t fall on my beautiful hardwood floors. I used Scotch Fasteners for the bottom of the letters since they would attach to the wood mantel.

Since the fasteners aren’t suitable for drywall, I used indoor mounting tape to attach the letters to the wall.

It looks at little bare when you look at it zoomed in. I love (no pun intended) the blue.

It looks awesome in the space though (well when you think about how the space will eventually look). The corner of the living room is really coming together. Now if the rest of the room will fall in line I will be happy.

Tagged As ,

Shop: Southeastern Salvage Nashville

Follow me on a little journey about how we found an amazing furniture in south Nashville by chance.

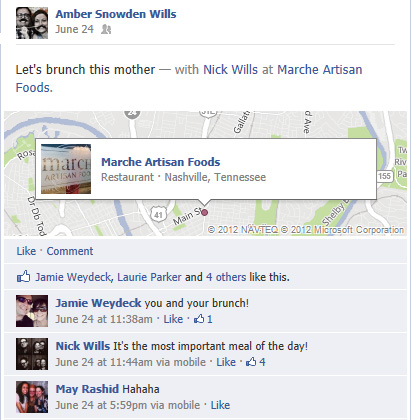
It all started with some brunch. As can be seen above, we get quite excited about the subject. While visiting family in Nashville (and flea market shopping) were the highest priority, finding an amazing Sunday brunch was not to be forgotten.

We decided to try Marche Artisan Foods near downtown. While waiting to be seated for the upcoming meal, we noticed in the lot over The Trunk Truck was parked and peddling goods. It’s kind of like a food truck, except they sell jewelry and other goods made by local artisans. This is the part that I wish we would have gotten pictures of but didn’t.

While we didn’t buy anything, Amber was intrigued by a pair of rugs they had (stick with me, I’m going somewhere).

She asked one of the ladies where they got the rugs. She responded “I’m not sure, but the chairs are from Southeastern Salvage.” Another lady in the truck shouted out “OH! I love that store!” We decided as we walked back to our brunch (which was amazing by the way) that we should check it out (according to google maps, it was about 20 mins south).

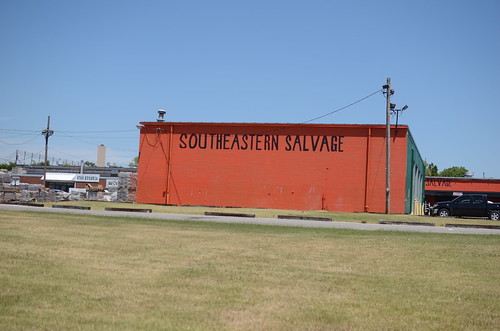
Looks charming right? Well, maybe not. But what it lacks in exterior aesthetics, it makes up completely in reasonably priced furniture.


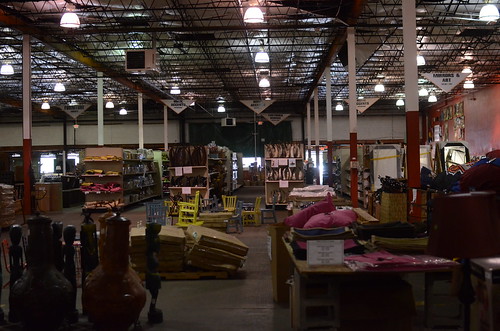
Inside it’s just a giant warehouse space filled with all kinds of awesome stuff. Reminiscent of the old Wisteria space in Dallas. Here’s a sample of stuff we found that we liked:

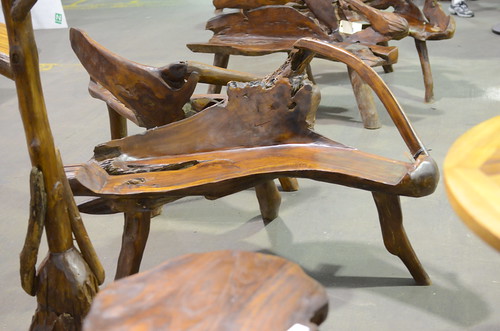
These wooden benches were between $40-60. It’s a total dead ringer for the bench outside Morrison Hair that Morgan did, just not as big. They’re a great deal.

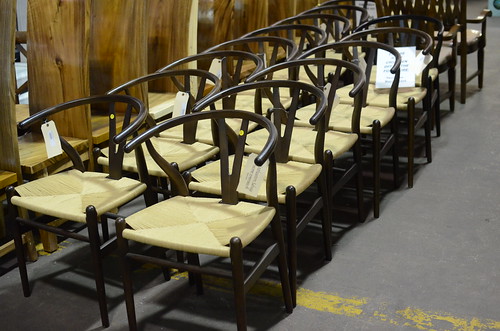
These wishbone chairs were around $100 (I’m remembering prices as best I can since I didn’t write anything down). They had a couple of blonde ones and a ton of the dark walnut. These things are iconic, beautiful and resonably priced (compared to). What’s not to love about that?

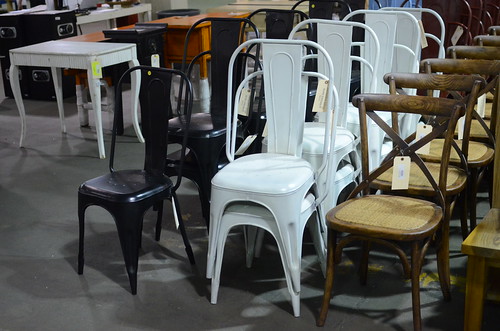
I told Amber that I really want some of these black metal chairs for our back patio. Then she reminds me we live in Texas and black metal outdoor chairs aren’t the smartest choice (oh well, they will be mine!). They were around $80. Not super cheap, but you rarely see them any cheaper than that. They had black, white, dark red, and light blue.

This bed is a great alternative to the tufted headboard at west elm. It’s got the base too, for $700! Not bad! Why am I shouting?!? It was a sexy gray linen, totally a great deal.

This beast was marked at $2600. Which seems like a lot, except for the fact that its a) all leather b) a chesterfield c) 38.7 feet long (measurments unconfirmed). Total statement piece. You could put 2 coffee tables in front of it and it would look amazing. Amber was salivating.

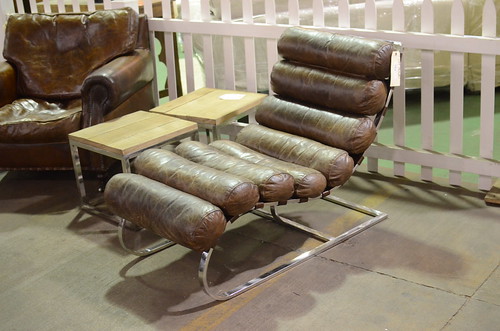
This last piece is the one I’m obsessed with, and the more I think about it the more I love it. It’s soft and worn full grain leather on a curvey metal base (Side note: side tables in the pics were only $100, not too bad either). I really want this chair. It is a cold, hard want I tell you.

It was $700. I know that seems a lot, but where else can you get a piece with this much impact for that dough (you’re looking at $2500 at least from Restoration Hardware)? Alas, the car was filled with Nashville flea finds, so big pieces were not an option.

I’ll come back for you chair. Wait for me. Stay pure.


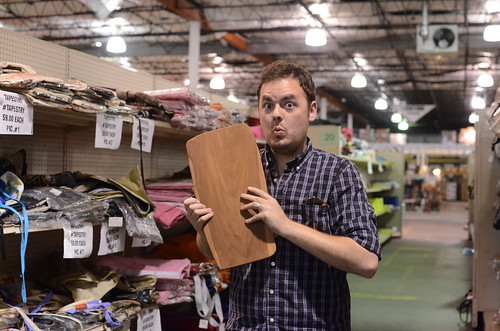
The only purchase we made was this teak charcuterie board (sorry about my face). It was $10, and you can always use more of them.

Overall, the place is definitely worth checking out! If you live in the area you need this place in your life! If not, then it’s definitely worth a little shopping expedition on vacation like we had! Sorry again for the shouting!

If you are more interested in the brunch: check out some of the play-by-play here here here and here. mmmmmmmm…… it was good.

Tagged As , , , ,

What can I say? This house is falling apart…

This one goes out to all the Do It Yourself’ers….. I’m sure we’ve all been there.

Especially the part where they say “We got no money, but we got heart…”

There are no tags for this post

I Killed It

Did anyone notice a change in our living room corner (besides the wall)? Here’s something to jog your memory…

Our modernica planter killed our rubber plant. I don’t know how it happened, but slowly it disintegrated until it looked like this.

It was pathetic, but I kinda already warned everyone it was going to happen. Anyway I knew we had to take pictures of the gallery wall. I wasn’t about to show off a dead plant, so we headed to Lowe’s for a quick switch.

We bought a Dracaena for $17. It requires a tolerant care level (but I’ve killed plants with that are supposedly resilient before). It should get enough light because it only requires 3-4 hours of indirect light. I only have to keep the soil moist, and I’m pretty sure I can do that. Here’s to hoping this guy stays alive!

Tagged As ,

Putting the Gallery Wall Up

Gallery-Wall-Tips-and-Tricks

I could have titled this so many things…how to take years of collected items and finally hang them on the wall, how to get what you’ve been wanting for 5 years in just 1 day…
But seriously since I shared the story behind the individual pieces yesterday, I wanted to share how they went from being individual pieces to being a gallery wall.

I literally took every frame and piece of artwork we own and played with arrangements on the floor until I got one I liked. I didn’t take pictures of each composition because I’m terrible at blogging I didn’t want to break my creative flow (yea that’s it). When I say composition, I mean looking at the spacing between frames, the grouping of different sizes, and the balance of old and new. I didn’t want all art/vintage on one side. Basically composing is all about finding a balance.

Once you find an arrangement you love, trace your frames. Make sure you label your too. After I traced this one, I labeled Rifle print. It will get all crazy if you forget to label.

Tape your traced frames on the wall to gauge how your arrangements looks in the actual space. Once I had this up, I felt like there was too much space between the frames in the last row.

I decided to add another frame up there. Notice the nice hot pink templates. Thank you west elm for providing these in your frames. It’s awesome and so are you. They even have the brackets marked making it all the more convenient. (As if you needed another reason to love west elm.)

Hammer some picture hanging hooks into the wall and voila you have your gallery wall. In case you were wondering here’s the breakdown of the frames from left to right, top to bottom: vintage (spray painted flat black), 8×10 west elm, vintage (spray painted flat black), antlers, 4×4 pottery barn, 4×6 west elm, target (I got on serious clearance and spray painted flat black, 8×10 pottery barn, 2 IKEA ribbas, and 5×7 pottery barn.

It’s a small gallery wall, but it completely warms up that space. It’s the same feeling of completion you get when you hang drapes. Not that the room is anywhere near done, but at least I can relish in another project down and a space inching towards completion.

Tagged As

Summer Pinterest Challenge #2

Nick’s pinterest project inspired me (well technically us) to finally install a gallery wall. Here’s the deal I didn’t want another piece of awesome art sitting around the house all lonely and wishing to find its place on our wall somewhere.


{via, via, via}

Here are my pinspiration pictures and what I like about them:

  • Art mixed with personal photos
  • Defined shape but various sized frames grouped organically
  • Sculptural elements
  • Vintage pictures and art (vintage = love always)

We have had gallery wall on the to do list for about 5 years, so this has been a long time coming. We chose the area over Nick’s Rhodes (and Ramona’s Schoenhut) in our formal living area. I know the new trend is huge art pieces instead of gallery walls, but we already have a massive art install planned for the room. As with everything in our house I love that it has a story, so here’s the story behind our newly hung collection of art and stuff.

Nick’s DIY art was by far the largest piece and the reason why everything else is up. Vintage boat print that’s been sitting in our room for a year (at least) adds vintage to the gallery. Our brass squirrel adds sculpture and a bit of quirk. We bought the Read More Books print at etsy Dallas, and I stole it from Ramona’s room. The restroom sign was the right shape, but I had other plans for it. It might be relocated later if I can find a good replacement.

Naked baby Ramona while cute will be replaced with a more updated picture eventually (next 5 years maybe? when her boyfriends start coming over?). The Rifle Paper Co Floral Heart print  was intended for Ramona’s room but never quite made it there. The antlers were also taken from Ramona’s room. They break the space visually and add depth to the gallery. The Christmas card out take of Ramona is classic.

Vintage map that was a $1 has been sitting on my desk forever. We honeymooded in Niagara, so when we found this post card antiquing it was ours. We bought the other card in Portland. It says, “I’m so happy we both showed up here.” It is sweet and sums up our feelings about our first vacation alone post-Ramona. I taped our photobooth pictures from the Ace in Portland together.

Unknowingly we grouped vacation things together with the map. A coincidence that also happens to be awesome. I love when things just happen like that.

So there you go! You know the story of all these pieces collected over a couple of years that we finally threw up on the wall. Ha threw as if it was that easy! I’ll be back tomorrow with the process, but I wanted to share the story first.

Check out what Sherry, Kate, Katie, and Michelle did for their pinterest challenge!

Gallery-Wall-Tips-and-Tricks


Check out our post on how we composed and hung the art.

Tagged As , ,