Trend Watch: Terrariums & Small Plants

Are you enjoying our various posts on Portland? They will end at some point, but we love the town and we spent a lot of time doing research there for the blog.

One major thing we saw during our time in Portlandia was the popularity of terrariums. They were prominent at all of the coolest locations we visited: hotels, restaurants, shops (home and otherwise). Let’s look at a couple of examples we snapped.

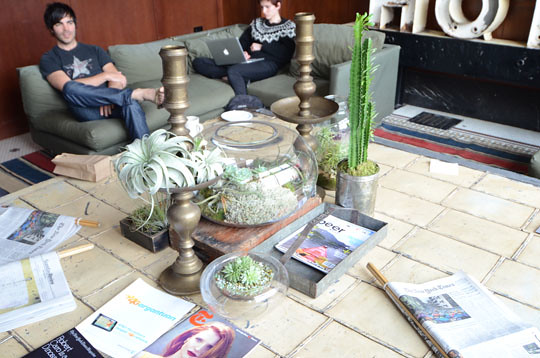
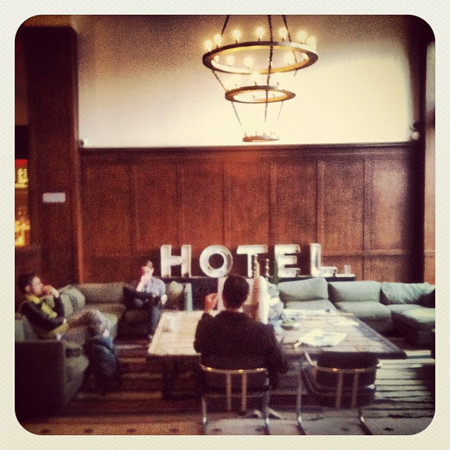
This pic probably looks familiar from our post yesterday. It’s the centerpiece of the coffee table in the lobby at the ACE. They are making use of 2 separate terrariums in this install. Also, using a couple of other trends we’re seeing: air plants, cacti and succulents.

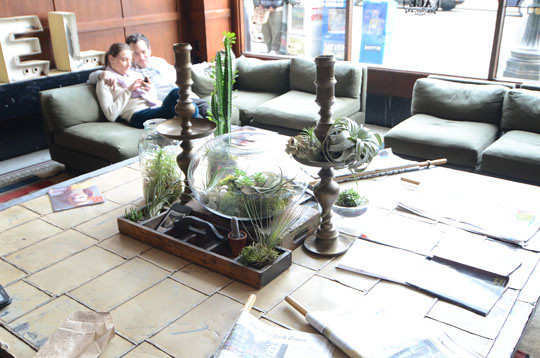
Here’s a view from the other side. More succulents, cacti and one really cool trend we’re seeing: using vintage boxes as planters.


(via)

Similar in this pic from a house tour I’m obsessed with on ApartmentTherapy. A vintage box used as a planter for succulents looks amazing.

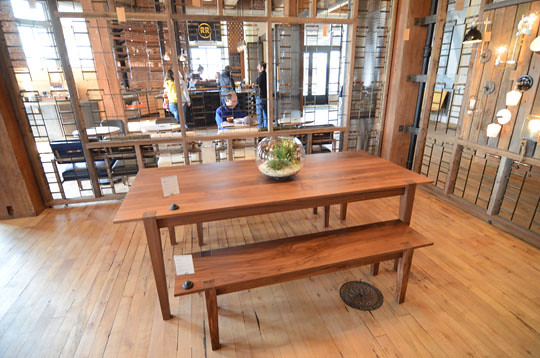
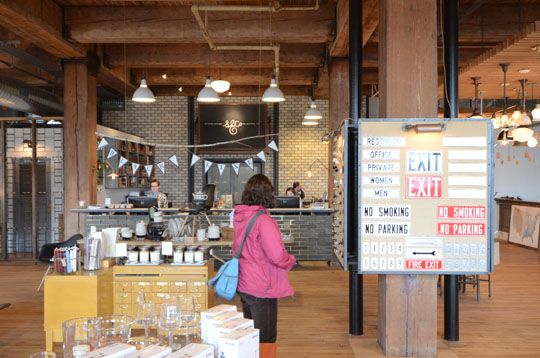
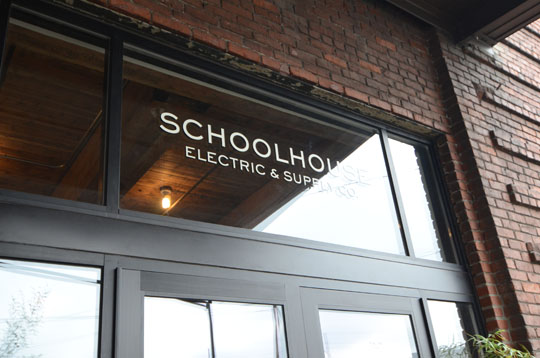
Schoolhouse Electric also got in on the terrarium trend.

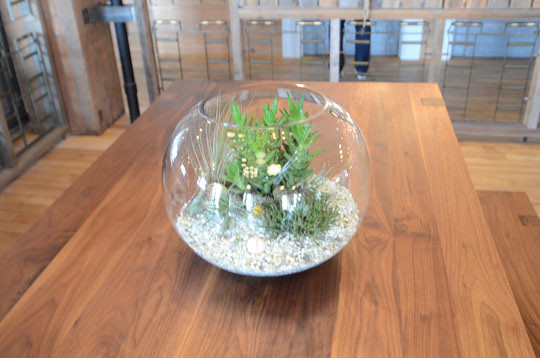
Here’s a zoomed in pic of their great looking terrarium.

So how do you get in on this trend?

Here’s some additional reading on the topic

Hope you enjoyed our little round up! Should we try to write more posts like this (Trend watching)? Let us know what you guys like.

Tagged As , , , ,

Ace Hotel + Mid Century Shopping Portland

So if you follow us on facebook, you already know we stayed at the Ace Hotel on our weekend trip to Portland. The entire hotel is a lesson in vintage minimalism decor. Check out the amazing lobby – layering vintage rugs, terrariums, hotel in vintage letters…

They have a true black and white photobooth. We couldn’t resist so yes we did this on 2 different days.

I honestly felt like I was staying in a hotel in 1920. I mean they still use real keys. It’s crazy awesome. We got one of the larger rooms, but it is still small. The art installation on the wall is a diagram about pushing off the wall while swimming. They sell the Pendleton Elk blanket which is totally awesome, but we weren’t about to drop $360 on it.   (If only we won the Oregon lottery – Nick is obsessed with their logo.)

So we headed out to do some antiquing because that’s what we always do. Antiquing on the west coast is a completely different experience than good ol’ Texas. There is a huge selection of mid century modern items. Our first stop was The Good Mod. Besides the people being not so friendly (read: did not say 2 words to us even though we were there for 45 min), the selection was amazing.

It’s basically a warehouse full of awesomeness mid century, danish and industrial furniture.

They make these awesome coffee tables in house. I would love to have 1 in the formal living. They are gorgeous. The prices vary, but you can shop all their stock online here. (See I told you their stock was amazing.)

I definitely wanted to take this MCM credenza home with me, but it was $1680. It’s more expensive in their online shop. Of course I could totally see it lacquered and stained in the formal dining. They know what they have, and it’s in good condition so it’s a great resource when you are looking for a specific piece. Also if you are in the Portland area, stop by. It was totally worth it.

We headed to Hawthorne for more vintage shopping before our dinner at Apizza Scholls. We hit up Hawthorne Vintage first. The window display was calling us…

They had like 3 Eames loungers. They were knockoffs, but seriously 3??? Come on West Coast share some with the South.

These chairs had such an interesting shape. If I lived in PDX, I would have bought them even though I don’t need any chairs. (Seriously I don’t. need. any. random. chairs.)

I saw credenza. It was $850 which I thought was a great price. I was actually a little mopey the rest of the day because I wanted to take this guy home. I know I’ve said that like 4 times this post, but it’s true. I considered moving to Portland to justify everything. Seems a bit rash though. However there is no sales tax so good argument Portland.

Apizza Scholls did not disappoint in case you were wondering. Wish I had a picture but we waited 2.5 hours, so once we got our pizza it was pretty much devoured within a few seconds.


Tagged As ,

Shop: Schoolhouse Electric (Portland)

So last friday I was sitting in downtown Portland waiting on Amber’s flight to land, drinking some stumptown coffee (best coffee ever btw), and writing this blog post. At that very moment, I was more of a hipster than I ever thought I could be.

Once she landed, we spent the weekend together in Portland. Walking and Shopping and Eating and Walking and Shopping and Eating and …… well you get the point. One of the main stores we were excited about visiting during our stay was Schoolhouse Electric.

If you’re not familiar with the company, I seriously recommend you check out this video. Great story, plus we saw Brian Faherty walking around while we were there.

Walking in, they definitely have the modern industrial feel locked down.

They’re known mainly for their light fixtures.

Which are amazing.

Their accessories are pretty awesome as well. (This is an ongoing theme, you’ll notice I’m a big fan of just about anything SE). As is their new furniture line.

And here’s some more shots from around the store.

Pretty Amazing right? Here’s what we picked up while we were there.

We got this cool ceramic house and vase for our collection of white objects for the hutch.

*Update: We used it on our Christmas table.

Here’s a zoomed in shot of the logo inside the vase.

We got this Egg Press pillow case for our bed

and this aluminum restroom sign, which we will make use of at a later date.

Overall, I’ve gotta say the place does not disappoint. All of the products are as cool in person as they are in the catalog. I would highly recommend checking it out if you’re in Portland and want to do some home shopping.


Tagged As , ,

Modernica Planter FTW

We have a couple of themes going at Wills Casa these days. One is that we are all about plant-life (ex. Last week’s post about Amber’s flower arranging class at the brilliant bows and arrows) and the other is home pieces that are both wood and walnut.

So a couple of months ago, when I saw this post by Morgan @ The Brick House (side note: that salon is the most amazing thing to happen to the internet since animated gifs) I became obsessed with the planter she used.

Fast forward a few weeks, and all of the sudden a familiar looking planter pops up on Fab.Com*. Turns out it’s from Modernica and it was on sale for $159. Though we aren’t really focusing on the Formal living area, it was pretty much a “gotta have it” moment. So we did and now it’s sitting next to my Rhodes looking sexy until we really start styling that room.

On a somewhat related note, we’re spending the weekend in Portland! Above is a picture I took of the lobby at the hipster hotel du-jour the ACE. Look for some Portland-centric content coming to the blog soon. Can’t wait to show you how we’re keeping the dream of the 90’s alive!

*If you don’t have a FAB account and want one, use that link. Amber gets a $25 credit when a referral makes their first purchase on the site. Hey, we like buying stuff for the house!

Tagged As , , ,

Flower Class: The Basics

This Wednesday Jamie and I went to a flower class at bows and arrows. I’ve been obsessed with their insane flower arranging abilities since Valentine’s 2011. Well now Alicia is sharing her mad skills with the masses which is wonderful news to me everyone. Have you ever seen good styling without flowers? No.

This is Alicia. I laughed out loud a few times while she was explaining the basics. It was at myself. My stupidity to be exact. I wasn’t even putting pre made arrangements in a vase correctly which is unfortunate because they would die quickly (read: the next day if they were hydrangeas). I’m sure some of this info is on the internet, but there is so much more to it than that. (Flower Class > The Internet)

Plus we got to create our arrangements in this awesome space. It’s a crazy old house that they turned from this into this…

I will be the first I admit my pictures do not even begin to do this place justice. I can barely take pictures, so don’t judge. (Sounds like I need to take a class for that.)

Here I am laughing at how awful I am at taking pictures. I really just wanted you to see the how awesome this front room is. Check out the amazing collection of the white vases on the black bookshelf. It’s exactly what we are thinking for the hutch in the formal dining. Of course we don’t have nearly enough white objects in there yet, but that’s the direction.

Alicia and Whitney left the creating up to us. We had a bunch of flowers we could pick from and got after it. Of course they helped when a certain flower didn’t look right or you had a hole in your arrangement. The setup was great because you experimented with what you thought would work, and they wouldn’t let you make a rookie error. I made a ton of rookie errors while Jamie didn’t. She’s way better at all things crafty than I am.

This is how my turned out in the end. It looked better before I left the shop, but I am a crazy driver it tipped over more than a few times on the way home. So it’s not like the most amazing thing you’ve ever seen. I won’t be getting emails to do anyone’s wedding or anything, but I’m so glad we got to do this. I won’t kill my arrangements as quickly. I can finally buy more than 1 flower to put into a vase for our photos. I had a ton of fun, and I know I’ll get better the more I make. You can check out more classes here. They even have a class for brides who want to diy their flowers…I know a few people who would benefit from that!

Also thanks to Jamie for taking all the good pictures in this post!

Tagged As ,

March Goal Check

Alright here goes another round of goal checking here at la casa.

1. Complete at least 1 crafty project per month.

Although most of the work for our nook chairs was done in February (piping & cushion), they were officially complete in March. I color blocked 8 bentwoods for the formal dining room. This is by the far the most exciting project for me. We ombred a dresser for the Pinterest Challenge. I sewed lined and pleated drapes for the formal dining. I’m pretty amazed that we’ve knocked out 4 significant projects around here in just 1 month.

2. Read at least 1 book.

Well I finished my February book…at the very end of March. It is a great book, but nonfiction takes me forever to read. Pink defines 6 right brain aptitudes then includes portfolio activities that you can do to exercise the right side of your brain. That was probably the main reason why it took me forever. I wanted to soak up all the information in the portfolios. Seriously a great read. Check it out.

3. Do more fun things with Ramona.

Yeah for ice cream. Little known fact my child eats the bottom of the cone before her ice cream is finished. I have no idea where she got that. We’ve had play dates about once a week this month which has been awesome for both of us.

4. Journal everyday.

I decided that instead of continuing to admit that I play catch up on my journaling every month I figured I’d share the best entry of the month. Drum roll please…Ramona calls her doll “baby sister.” (I know it’s sad. The kid needs a sibling.) She put Baby Sister in time out. I asked her why Baby Sister was in time out. Ramona (very matter of factly) responded Baby Sister pinch me. Of course the story changes every day (yes putting Baby Sister in time out is a daily thing now) sometimes Baby Sister hits Ramona in the face…oh goodness I hope this isn’t a sign of things to come.


Tagged As

Craigslist Score…….Like We Need A Hole In The Head

That’s how bad we needed a new dresser. Not to mention 2 new dressers. But before you begin judging our furniture hoarding, let the story unfold a bit.

Last Saturday Amber and I were embracing each other romantically, the same way we always do (opposite sides of the couch, laptops open, dvr on). When suddenly Amber became ablaze with passion.

No friend, it was not for me, rather for a set of Mid Century Dressers she saw on craigslist.

And the price was a steal at $150 for both. Amber emailed the owner to see if he still had them. He said he did, but a lady was coming to get them.

We told him we could come get them immediately if it falls through. So we waited (mainly watched TV and surfed the interwebs, you know, our romantic embrace) and figured we’d missed out. He called us about an hour later and said the lady couldn’t pick up both pieces that night, and he was ready for all the emails to stop. Since we told him we could get them immediately, he figured we were the ones to contact first. We told him we were on our way (crossing our fingers that we could get both in the back of our Volvo).

It was 9:30 at night when I set off to Flower Mound (about a 40 min drive). I got there and we started to load up. We got them in our car, but we couldn’t close the back, so we tied it shut. I just drove slow on the way home. It wasn’t the classiest scene I assure you (backseat packed with dressers and the trunk tied with a rope), but it got the job done.

Here’s is what they looked like when we got them home:

This is the piece we were mainly interested in. It’s only 60″ wide, so not as wide as we wanted for our buffet, but it will work until we find a longer one. When we do, we’re thinking this will become the dresser for the next nursery (hope the next kid likes mid century modern furniture).

This bad boy we don’t have many plans for yet. We could probably turn it around and sell it for what we paid for both (probably more, but that’s bad craigslist karma). And we might, but we’re going to hold onto it for a while and see if we can find a use for it (office storage maybe?).

Both pieces need to be restored. They are very roughed up. The shell and drawer faces are both veneer, which is a bit tricky (and slightly odd because the drawers are solid wood). Amber has started the process on the top one and we can’t want to see what it’ll look like when it’s done.

Tagged As , ,

How to Sew Lined, Pleated Drapes

Supplies:
Fabric (use this calculator if you need your panels to be a specific width)
Drapery Liner or Muslin
Coordinating Thread
Wall Pleater Hooks
Pleater Tape (you need the width of your fabric x2)
Curtain Rod
Curtain Rings

Start by washing and ironing your fabric and liner to shrink it. I used Etsuko Furuya for Kokka. If you skip this step, then just don’t ever wash your curtains and you’ll be fine. I always prewash the fabric because I don’t want to run that risk. (I can just see myself dropping a cake on them.)

Begin by attaching the liner to the top of your fabric. Fold the fabric and the liner under about 1/2″. Pin them together leaving 1″ on each side for the hems on the side. You could use hem tape for this step if desired.

Next attach your pleater tape. Make sure your pockets open at the bottom of the tape since that’s where you’ll put your hooks into to create the pleats. Pin your side hems over the tape. The hem is about 1/2″ with 1/2″ folded under hence the 1″ you left when you sewed the liner to the fabric.

Once you have attached your pleater tape, pin the sides of your drapes. Keep the hem 1/2″ on both sides and sew straight down the side.

I like to hang the drapes before I finish the bottom hem. I decided to hem the drapes so they would gather just slighted on the floor. I measured an inch longer from the floor for the gather. Then added 1.5″ for my hem. Turn 1/2″ in which leaves you with 1″ hem at the bottom.

The pleater tape creates 5″ pleats. Decide your spacing and desired number of pleats. Insert the prongs into the pleat pockets. Pinch your fabric together and insert the rest of the prongs (4 total).

I used 2 end hooks on each sides to secure the fabric at both ends when it hangs. I skipped 1 pleat pocket between pleats which is about 3″ between each pleat. My fabric was 57″ wide before the 6 pleats that were added. It is 31.5″ wide with the pleats. It will still cover the window when both panels are pulled. Not that the drapes will ever been drawn in the formal dining, but just in case there is a zombie take over the windows can be covered.

Hang your curtain rod almost to the ceiling. Then attach your hooks to curtain rings. Our rings are just drapery clips. This give us the option to pull out the pleats and hang with the clips if we want to change it up a bit.

**This post contains affiliate links along with awesome content.
Tagged As , , , , , , ,

Formal Dining Drapes Done

The drapes for the formal dining room are finished! (Well sort of I need to hem them, but that won’t take long.) It’s amazing how much drapes make a room look finished even when it is far from it. Also don’t the bentwoods look amazing?

There’s our next steps in this room:
-Wingbacks reupholstered
-New rug
-Style the hutch
-Artwork
-An awesome buffet (like this)
-Place settings

We won’t be tackling any of that tonight because Nick is taking me on a hot date to see Hunger Games! I’m really too excited for my own good. We will be back with the how to for our lined and pleated drapery beauties on Monday. Have a wonderful weekend and may the odds be ever in your favor.

Tagged As , ,

Gather Ye Supplies

Remember when I bought that awesome fabric for the formal dining room? I couldn’t wait to make the drapes especially after we got our bentwoods in there. I’ve made a total of 9 curtain panels for our casa so far, so what’s taking me so long to make these?? Well we wanted to do something different than a straight panel hung with clips.

Enter the problem. I wanted to pleat the drapes but had no idea how to do that. I should have just googled immediately, but I didn’t. I assumed it was going to be difficult and wasn’t in the mood for a difficult sewing project (hence the procrastination). However when you have a blog about your house, you kinda have to do projects or everyone will know how lazy you are. I found this tutorial and realized it was going to be so freaking easy like just 2 steps more than a straight panel.

I set off to Walmart to get my craft on. Yes that’s right Walmart. I actually just went for the pleater hooks but found everything I needed. This was a huge win since I don’t live particularly close to a craft store, and I had Ramona in tow.

Here’s the breakdown:
Wall Pleater Hooks 2 @ 2.97 each (I may only need 1, but if I can save an extra trip to Walmart I won’t complain.)
Regular 3-7/8″ Pleater Tape 4 yards @ 1.27 (It wasn’t on the Walmart site, but it was there.)
118″ Muslin for lining…$39.85

Total $55.07

Here’s the deal with the muslin. Walmart had 3 options: $3.97, $5.97, or $7.97 per yard. Mine is the $7.97 one. I needed 7 yard. The math doesn’t work out, but they only charged me for 5 yards. I had originally chosen muslin that was $3.97 per yard. However there was a huge defect and they didn’t have 7 yards for the $5.97 option. I didn’t want to pay $8/yard, so I asked if I could get it cheaper since I didn’t have other choices. The lady said she’d only charge me for 5 yards. It was still more than I wanted to pay, but this muslin is 118″ wide so it works better for my extra wide drapery fabric.

Long boring story = cute picture of Ramona (messy hair and all). I’m not going to lie turning massive amounts of fabric into drapes while chasing this cutie is exhausting. Worth it though. It’s nice to see things actually getting done around here. (Also cool to see our dresser on pinterest.) Hopefully, I will have the drapes up for your viewing pleasure Friday afternoon-ish.

Tagged As , , ,